
The dying of Google Optimize is upon us. And wowee, aren’t you slightly bit heartbroken. Gone are the times the place you’ll be capable of swap a button in your web site from purple to inexperienced and run a senseless A/B take a look at. Now it’s important to pay $60,000 yearly for that. However wait! What if I advised you which you could proceed to run A/B testing FOR FREE, leveraging instruments which might be most likely already in your web site. Would you pay me $60,000? How about $2? I’ll take it…
Now don’t get me fallacious, it’s best to completely put money into an A/B testing platform. They’ve a butt-ton—(can I say butt-ton?…no? Okay how about boatload)—a boatload of options that transcend what I’m about to indicate you. Additionally, A/B testing typically ought to have a devoted course of, with a well-thought-out testing matrix, strategists, builders, designers and analysts. In the event you’re going to have all of that, it’s best to most likely have a devoted software,proper? In the event you simply need to be slightly whimsical about it although, I’ll present you the right way to do testing with out something fancy. Just a bit grease in your Google Tag Supervisor wheels and any analytics platform.
Primary Steps Beneath:
Find out how to A/B Check for Free with Google Tag Supervisor, and any advertising and marketing analytics software.
Let’s get began. First, this put up assumes that you’ve a fundamental understanding of Google Tag Supervisor, triggers, variables, & tags. In the event you don’t, then please go away and go to MeasureSchool’s YouTube to study all in regards to the software. If you’re nonetheless studying then I’ll assume we’re good to go.
Create a New Cookie in GTM
First lets construct a Cookie in GTM by importing the template “Cookie Creator” from the Group Gallery. Evaluation the permissions (which permit cookies to be written in the event you specify them within the template) of this Tag Template and choose “Add to Workspace.”
You can too simply construct a cookie utilizing customized HTML, however why work more durable than it’s important to? After getting imported it into your templates and accepted permissions, you can begin constructing a number of cookies with ease.
Earlier than we begin constructing our experiment, we have to permit this cookie creator to construct the cookie we inform it to. To do that, open the Cookie Creator template and navigate to “Permissions”.

Subsequent add an allowed cookie for _gtm_exp or no matter identifier you’d wish to construct in your GTM experimentation.

Create a GTM Experiment Tag
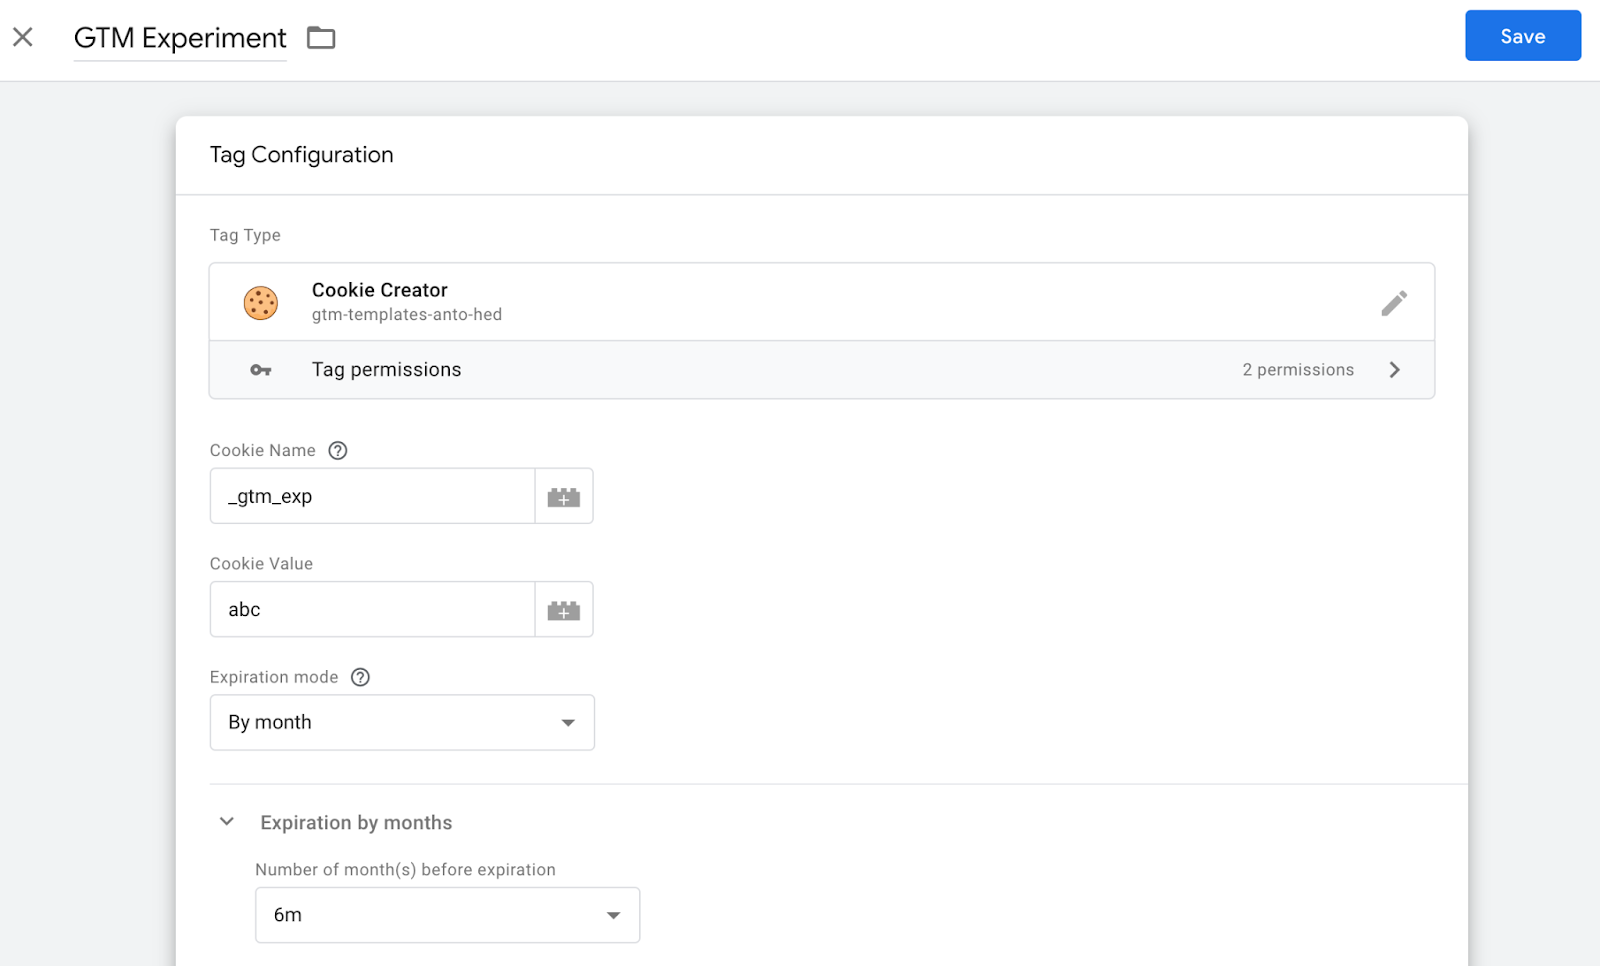
Within the Tags tab, create a brand new tag utilizing the Cookie Creator tag template you’ve simply saved.
- Set Cookie Title to “_gtm_exp”
- Set Cookie Worth to “abc”
- We’ll be updating this worth later to dynamically populate based mostly on random allocation. Since we are able to’t save the tag with a clean worth, let’s add “abc” to the cookie worth for now.
- Set Expiration Mode to “By month”
- Set Expiration by Months to “6m”
- “Even when your experiment length is shorter than 6 months, having an extended expiration date ensures that customers will proceed to see the identical experiment on return visits till this cookie is eliminated”
You might need to set extra cookie options- like SameSite when you have subdomains, and so forth. -but we’re going to go away it clean for now. Be happy to make use of this FireFox page as a useful resource for all of the completely different configurations you are able to do with cookies.
It can save you the tag and not using a set off for now. We’ll come again to it!
Construct a Variable to Seize the first Social gathering Cookie
Let’s now go into our variables part and construct a 1st Social gathering Cookie to seize the brand new cookie worth that we created:
- Navigate to the Variables tab
- Click on to create a brand new Consumer-Outlined Variable
- Choose “1st Social gathering Cookie” because the Variable Kind
- Replace the Cookie Title to “_gtm_exp”
- Give your variable a reputation and save

Superior. That was simple. We’ll come again to utilizing this later.
Construct a Variable to Generate a Random Quantity Between 0-99
Now, we need to create the performance to generate a quantity from 0-99. This may grow to be the premise of our take a look at performance.
- Click on to create one other Consumer-Outlined Variable
- Choose “Customized JavaScript” because the Variable Kind
- Add a operate to generate a random quantity. Right here is a few code so that you don’t have to go searching on the internet for it. You might be welcome.
operate() {
    var math = Math.flooring(Math.random() * 100);
    return math
}- Marvel in surprise on the extremely superior, complicated little bit of JavaScript you’ve simply written
- Title your variable “Random Quantity (0-99)”
Create a RegEx desk Variable for the Cookie
We now need to use our random quantity to set a cookie worth based mostly on whether or not a consumer is assigned to the management group or the take a look at group. You may additionally create a number of variations by adjusting this logic with the quantity of numbers that symbolize a model. On this model we’re on the lookout for 0-49 & 50-99 to set completely different variations, however you might simply regulate to 0-33, 34-66, 67-99 for an A/B/C take a look at (and so forth.)

- Create a brand new RegEx Desk variable
- Set the Enter Variable to the random quantity variable you’ve simply created
- Use this RegEx to focus on the split-test numbers:
- Management Group: 0 – 49
- RegEx Sample: ([0-9]|[1-4][0-9])
- Check Group: 50-99
- RegEx Sample: ([5-9][0-9])
- The Output values shall be based mostly on the kind of take a look at you’re working. For this instance, we’ll be doing a easy CTA button textual content change.
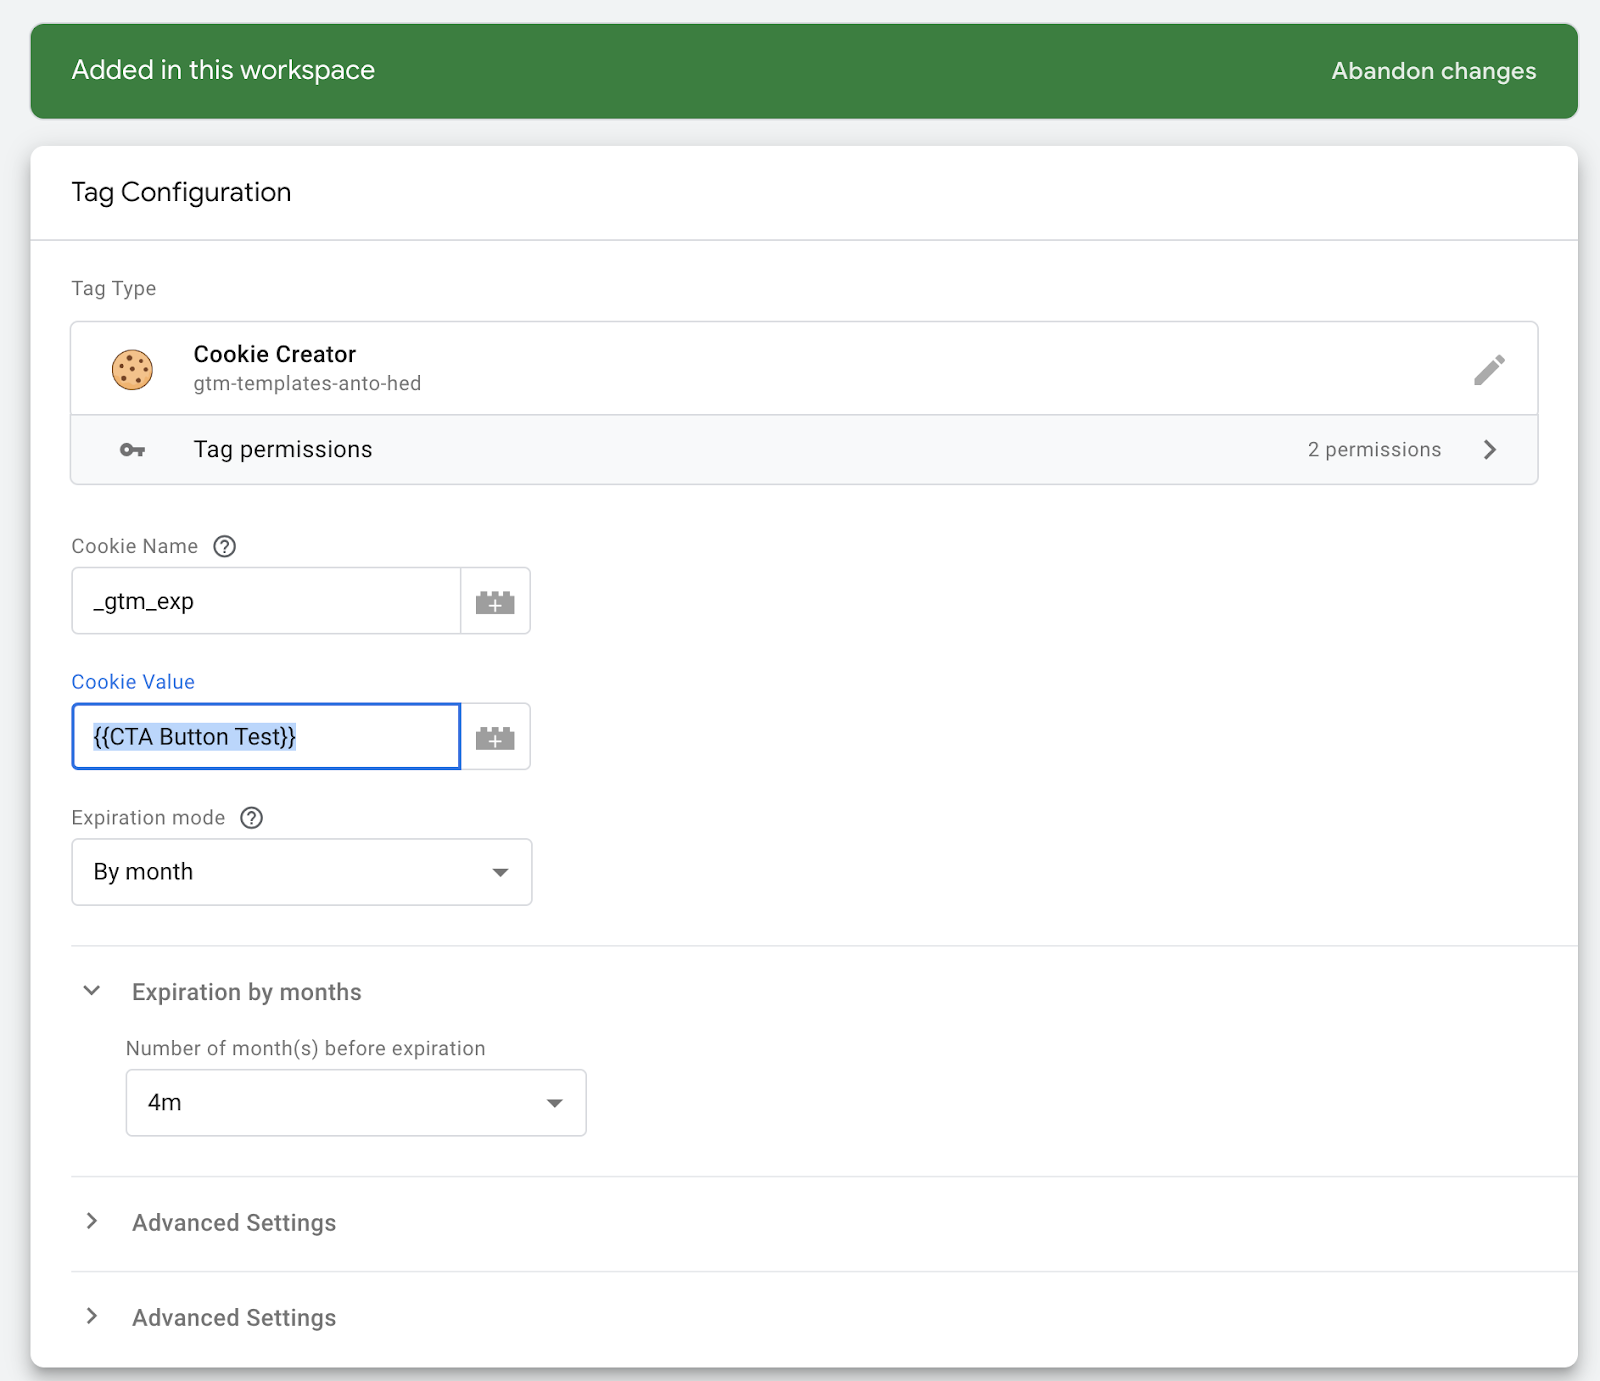
Replace Cookie Tag with RegEx Desk Variable
Now that we now have our RegEx desk, we are able to use it to construct the performance of our cut up take a look at. We’ll be utilizing the 0-49 randomized quantity to set the management & 50-99 to set the variant.
To do that we need to return into our cookie creator tag and set the Cookie Worth to our RegEx desk.
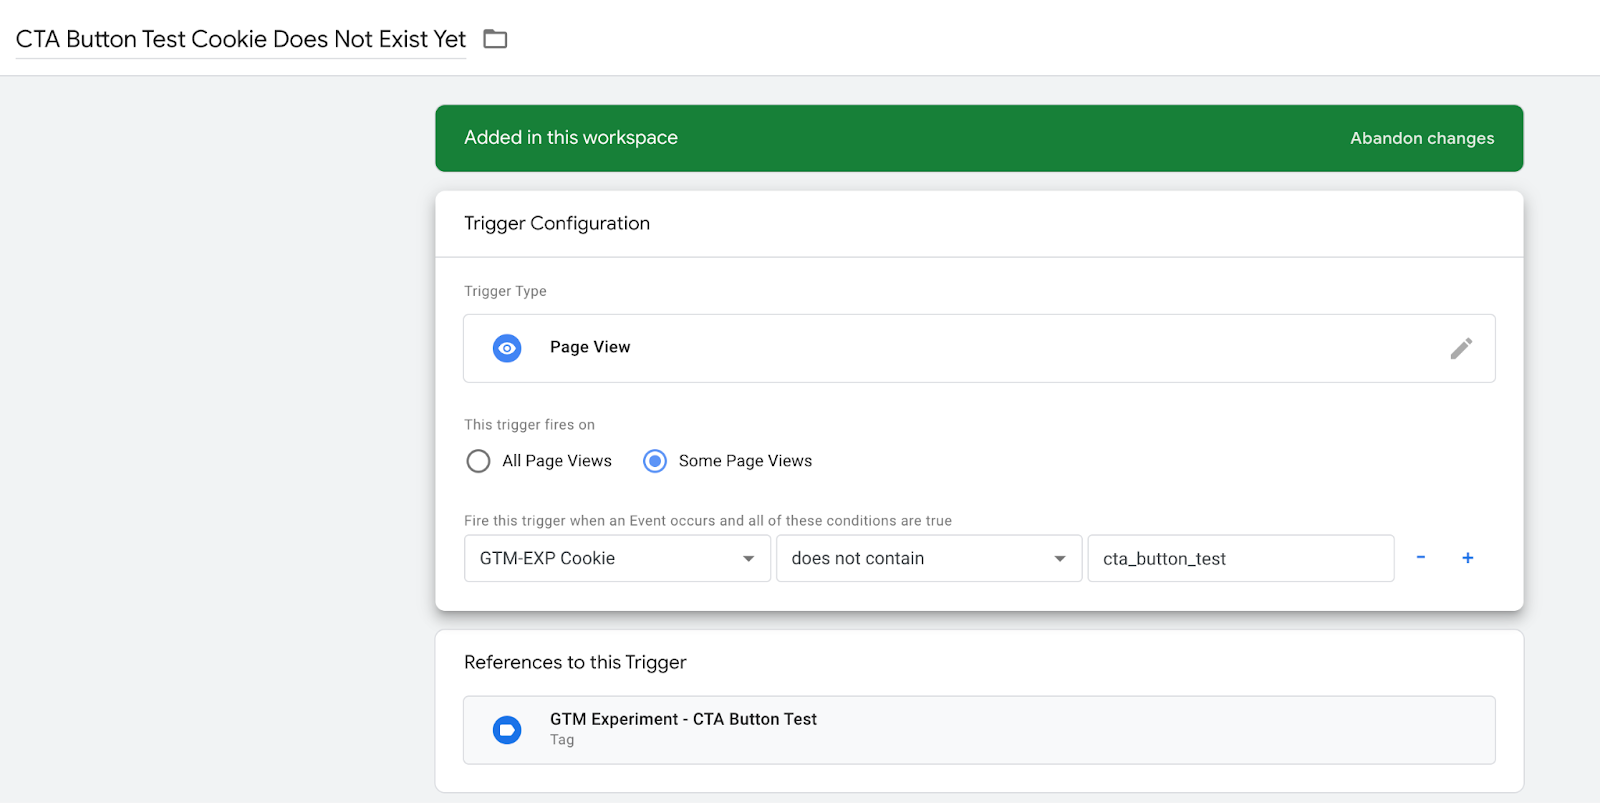
For the set off we wish it to fireplace on all pageview occasions the place the cookie doesn’t but have a price that features our take a look at.
Now that we now have the cookie in place, we are able to construct our precise take a look at.
Create a Customized HTML Tag with Your Adjustments
Now might be essentially the most difficult half. You’re going to must know a little bit of JavaScript however in the event you don’t, ChatGPT is a good useful resource. Simply ask it that can assist you goal and alter the ingredient you need to change. Sadly, GTM shouldn’t be geared up with a visible editor like Google Optimize that can assist you change. If you want you need to use a chrome extension akin to “visual css editor” which has quite a lot of the identical performance as a CRO visible editor and even helps you export code. Total, you’ll most likely hit a snag sooner or later and want some assist from both AI or a JavaScript developer. Regardless, I used ChatGPT for this transformation and if it’s adequate for me, it’s adequate for you!
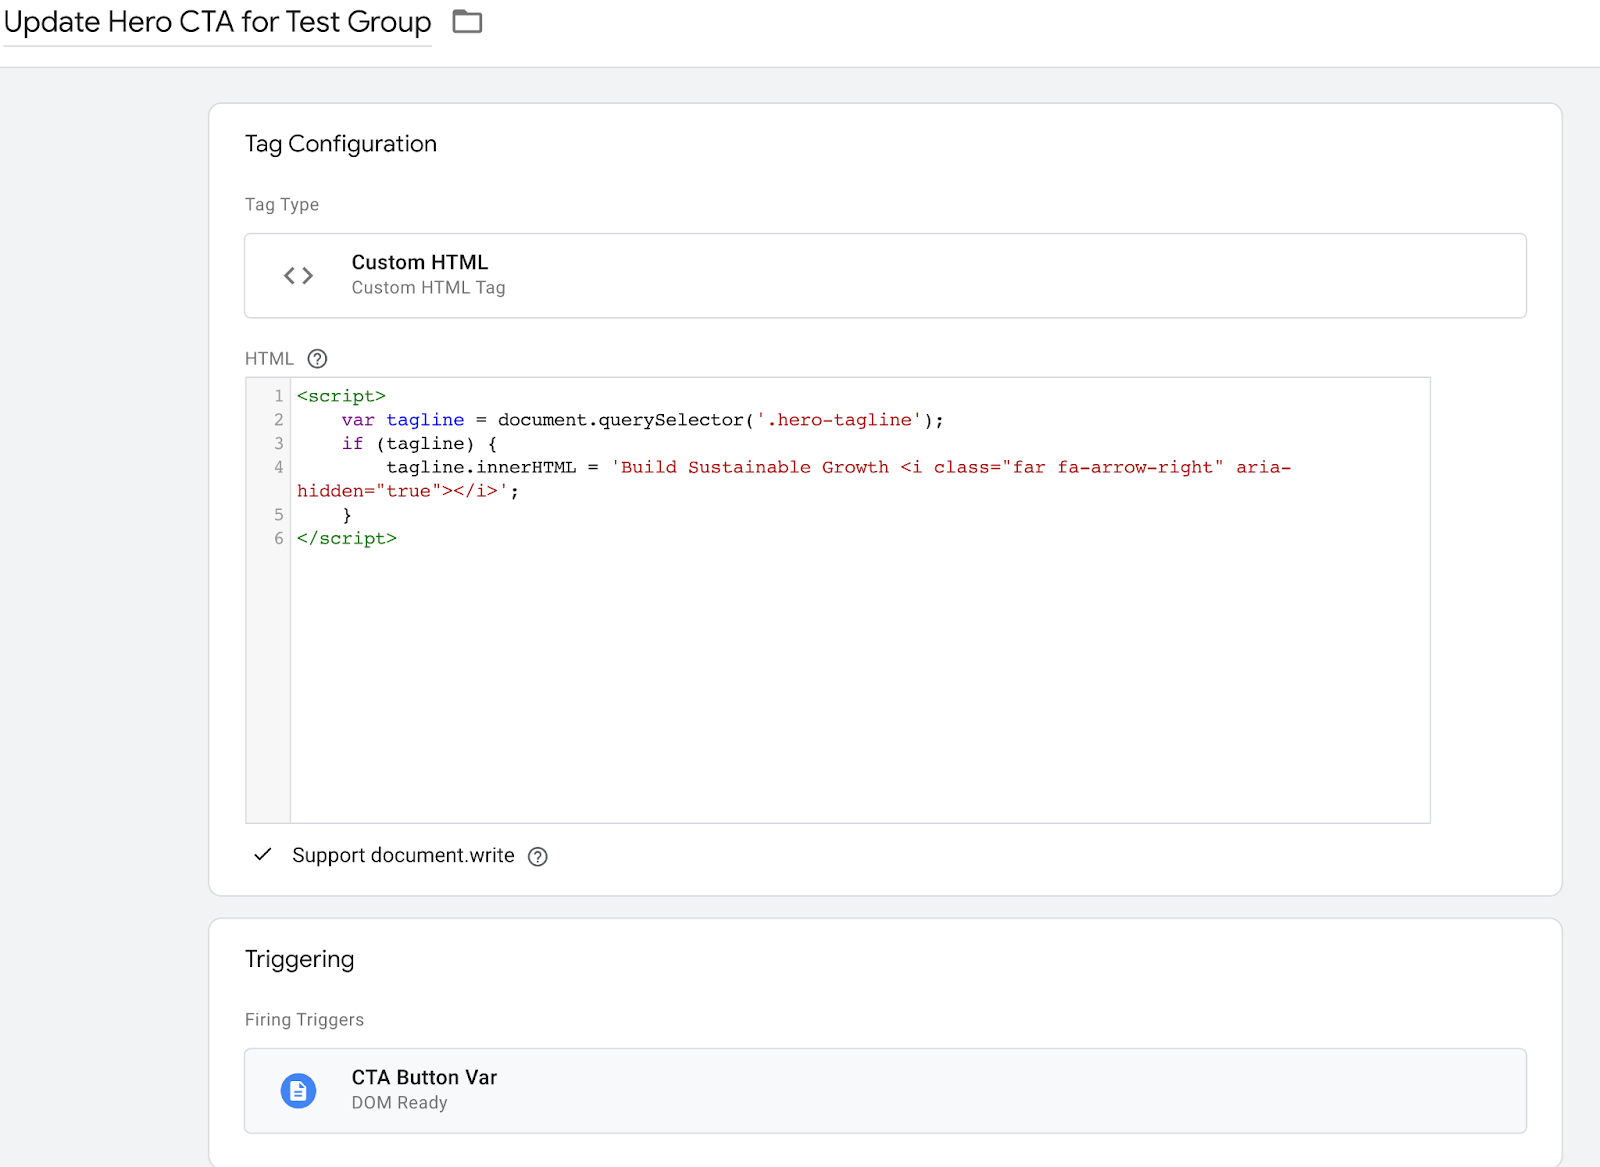
For this instance, we’ll be updating the textual content of the hero tagline by utilizing a Customized HTML tag.
Step 1: Create a brand new Customized HTML tag. This may comprise any needed scripts to switch web site content material in your Check Group.
Step 2: Within the HTML part, add your script. This instance shall be utilizing the script under to replace the textual content of the hero tagline:
<script>
    var tagline = doc.querySelector('.hero-tagline');
    if (tagline) {
        tagline.innerHTML = 'Construct Sustainable Progress <i class="far fa-arrow-right" aria-hidden="true"></i>';
    }
</script>
3. Give your new tag a reputation. On this case, we’ll identify it “Replace Hero CTA for Check Group”
Now that we now have our code, let’s set off it on 50% of the site visitors.
Set off Your Check on the Variation Set off.
Now that the cookie is positioned, we simply must search for the worth we wish the take a look at to set off on and add our set off situation to our Customized HTML tag.

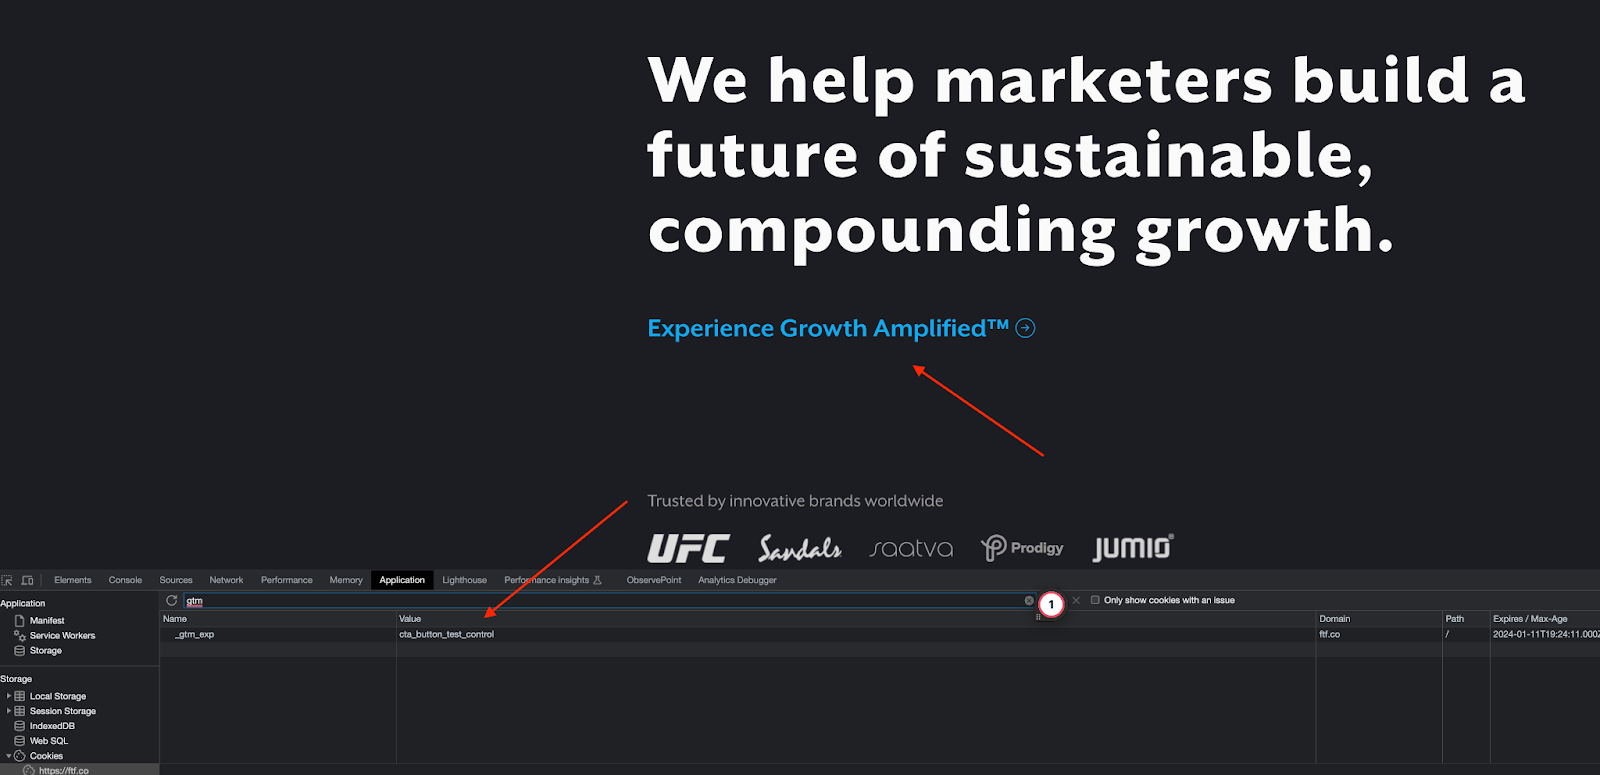
You’ll seemingly need to take a look at at this level. Testing is fairly easy. Simply go to your preview mode, and open the web page you need to take a look at on. You’ll get your randomly generated worth and it’ll set a cookie because it’s your first time there. You’ll be able to then navigate to the Chrome debugger and edit the cookie worth between your management and variant by discovering the cookie worth in Functions and on the lookout for our _gtm_exp cookie.

Nice, now that we now have the take a look at setup portion achieved, let’s get that child into our analytics system.
Construct Out the Analytics Portion
This subsequent half may be utilized to ANY analytics software. I shall be focusing this weblog on GA4 and Microsoft Readability however the identical course of may be utilized to Piwik Professional & HotJar, Matomo & ContentSquare. No matter you need. We’re going to use it to each a advertising and marketing analytics software and a heatmap software program only for enjoyable however it may be used with only one software if that’s your choice.
Add to your Analytics Tag
First, similar to with CRO instruments, we want to ensure our cookies load earlier than info will get despatched to our analytics instruments. So in case you are firing your advertising and marketing analytics software on Pageview as properly, we’re going to wish so as to add an analytics occasion that fires when the cookie is about.
Let’s create the occasion. This occasion fires the precise occasion but additionally units the cta_button_audience to the management or the variant in our GA4 and ties it to the consumer. This would be the foundation of our viewers parameters.

Now let’s make it a cleanup tag for our cookie placement.

Superior. One last item. We additionally need to add to our important configuration tag. This ensures that as folks come again to the web site and the variant is there, it additionally communicates the worth to the user-level customized dimension. It ought to stay with that consumer however it is a secondary degree of safety from GA clear cache and so forth. It turns into slightly safer than simply counting on the occasion itself because the occasion solely fires the preliminary time that the consumer will get bucketed. The cookie will stay as a price so long as it’s saved within the individual’s browser. After the preliminary placement, the cookie needs to be there on web page load so you may seize it together with your important configuration on pageview.

Observe: You can too simply transfer GA4 config to Dom Prepared as a substitute of doing the above (with the identical configuration tag adjustments) however some individuals are violently in opposition to altering the place GA hundreds, in order that’s why we did the above strategy.
One other Observe: you may truly set the variable to an occasion degree parameter as a substitute of a user-based one since we shall be constructing it as an viewers who noticed the actual occasion anyway, however I believe Consumer Properties are a bit cleaner. If you’re working low on Consumer-level customized dimensions, occasion customized dimensions are fantastic.
Construct Your Conversions
If you have already got a conversion that you simply need to use with this setup you may skip this part. In any other case, if you wish to arrange a secondary conversion or you don’t have any conversion you may observe together with the under to arrange one.
Often, our important conversion could be a kind submit or buy, however we’re going to use cta clicks for this instance.
Go into preview & debug mode and carry out the motion that you simply need to observe.

Be sure you have any related built-in variables (click on id, click on class) and triggers (all components/hyperlink clinks) enabled in your GTM.
Navigate to the clicking motion that you simply did and discover the related variable that you simply need to observe.

Construct your set off and occasion/conversion.


Nice! We’ve simply arrange the motion we need to use in GA4 as one among our conversions. The good factor about constructing an viewers or section with our variations is that you need to use these along with different conversions or occasions which might be already in place (thanks pages, and so forth.)
Set Up the Conversion in Your Advertising Analytics Software
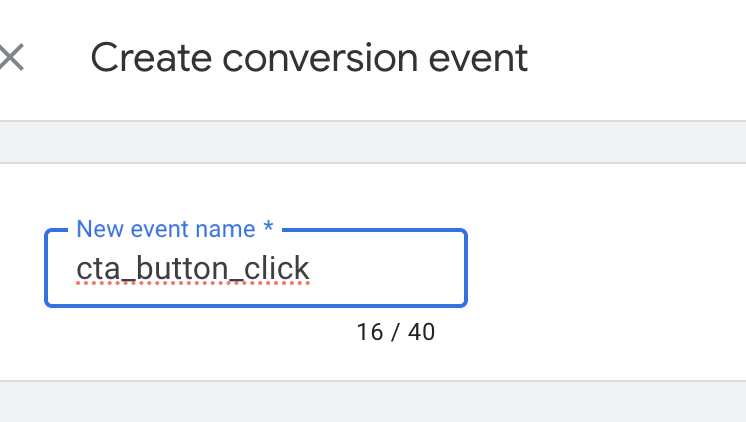
In GA4, there are just a few steps we have to take to get this to work. First, we have to arrange our conversions. Some might already be arrange, however the one we simply constructed above we have to set as a conversion. You’ll be able to both look ahead to the occasion to indicate up in GA4 after which examine the little blue toggle subsequent to the occasion, or we are able to navigate to conversions and enter the identify of the occasion manually. Let’s do this one.
Set Up Your Customized Dimension in your Advertising Analytics Software
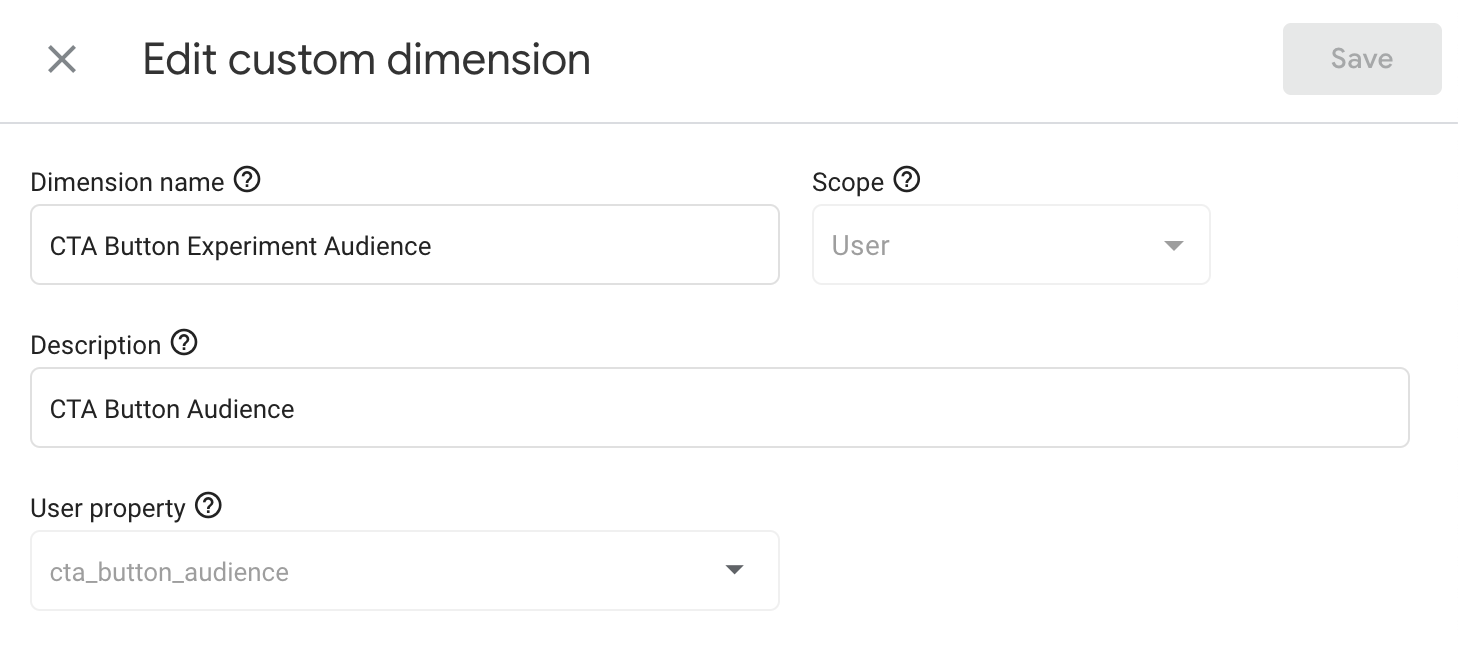
Now that we now have our conversion, let’s navigate to customized dimensions. Let’s create each a Consumer based mostly customized dimension for our cta_button_audience which is dealing with our cookie worth.
Observe: In the event you don’t have click_text arrange as a price in GA4 already, you’ll need to do this now for the cta_button_click occasion that we constructed. Each customized dimension must be outlined in GA4 for the information to indicate up within the interface.
Lastly, Let’s Construct our Audiences!
You’ll need a distinctive viewers per variant (together with management).
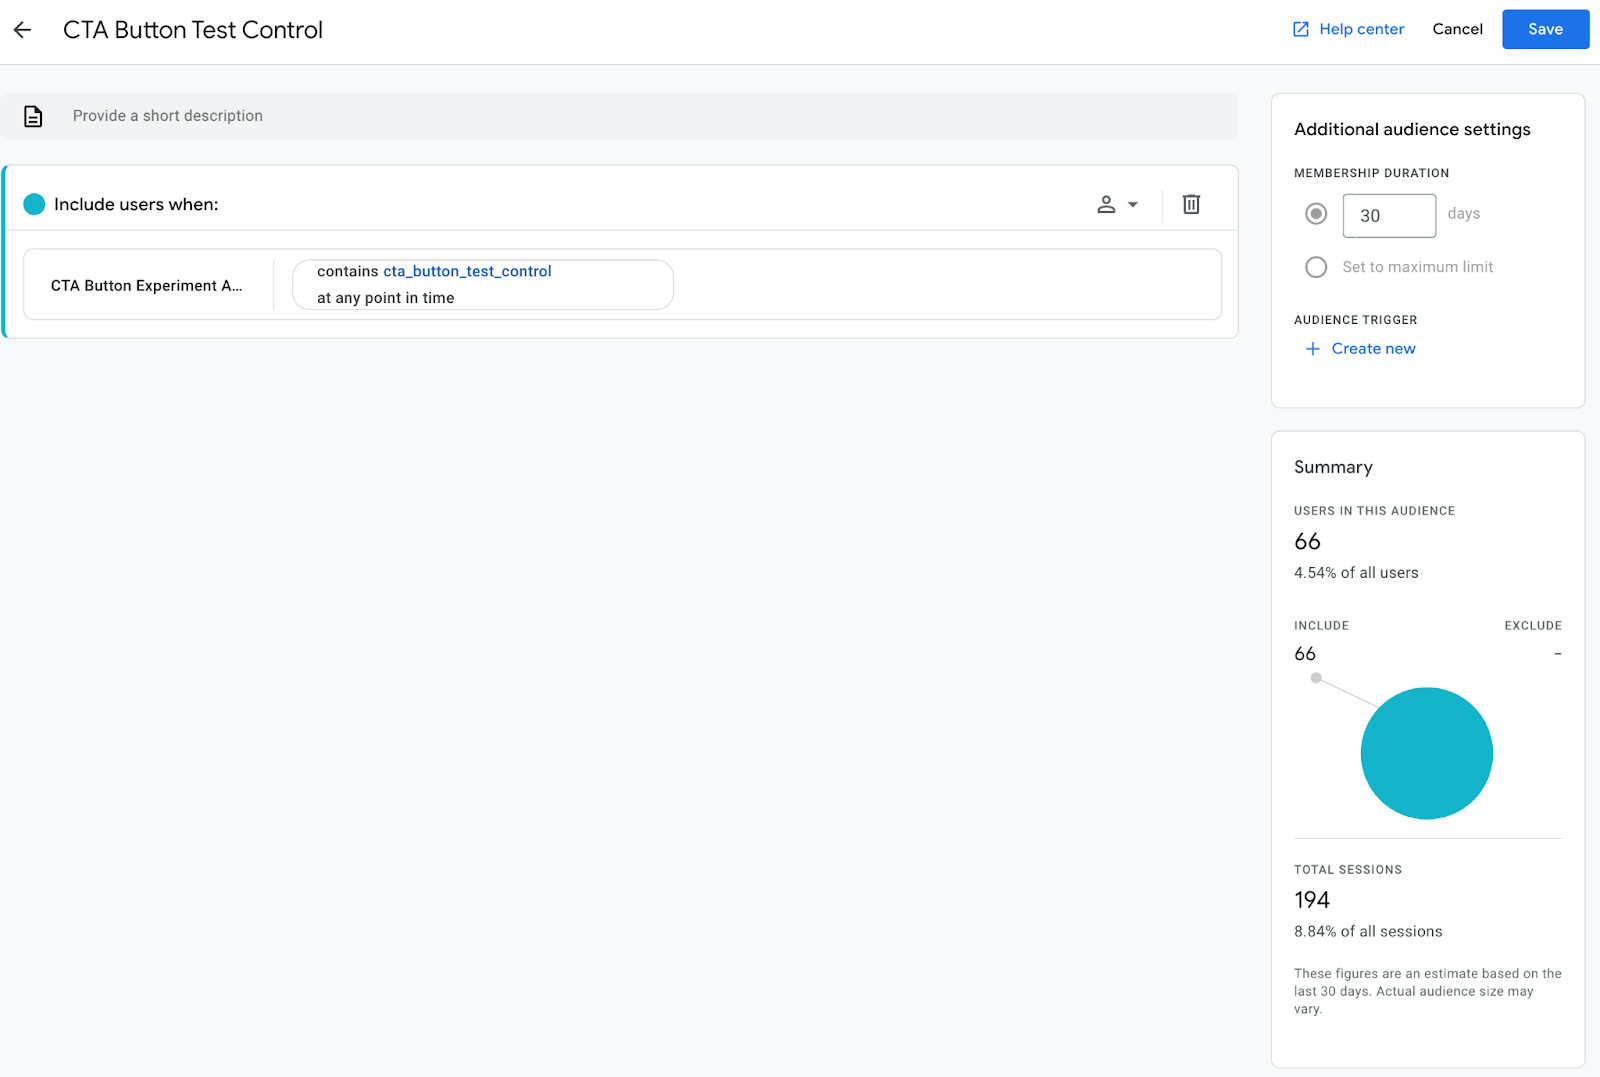

You’ll need to verify that the quantity of customers in each the variant and the management are comparatively equal. This shall be an extra-level of consolation that our triggers and tags are working.
Now all we now have to do is do an viewers comparability with our conversions and we’re swimming in A/B take a look at sauce.
You’ll be able to construct an viewers report by making a customized report within the library and utilizing the viewers as a dimension.
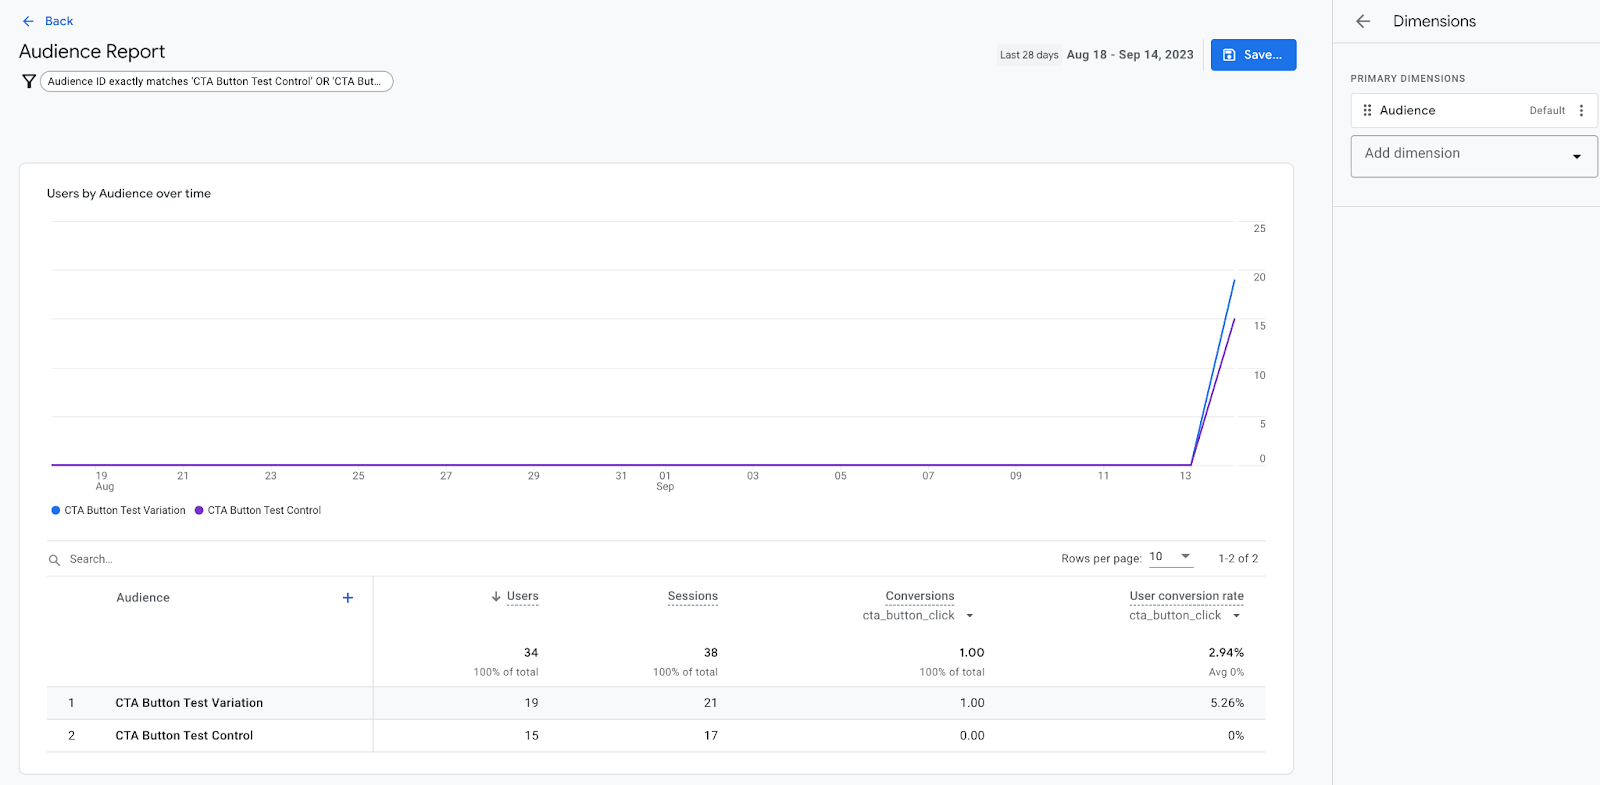
Alternatively, you might use our user-level customized dimension

I discover it’s a bit cleaner to make use of an viewers as a result of you may archive audiences when you find yourself achieved with the take a look at and you’ll select to make use of the gtm_exp cookie to construct different exams sooner or later and audiences assist present a common cleanliness across the reporting.
To run statistical significance monitoring you need to use any A/B take a look at calculator however my most well-liked is CXL’s AB Test Calculator. Simply dump your knowledge in and it’ll calculate the carry for you!
Nice job! You made it and might cease right here. Or we are able to carry each variations into Microsoft Readability. You need to proceed??? I APPLAUD your tenacity.
Combine with Heatmap
For this a part of the lesson, we’ll assume you’ve got Microsoft Readability up and working. I like Microsoft Readability rather a lot. It’s free and has a TON of options which might be actually useful. For this specific activity, we’re going to be utilizing the customized tag filter characteristic.
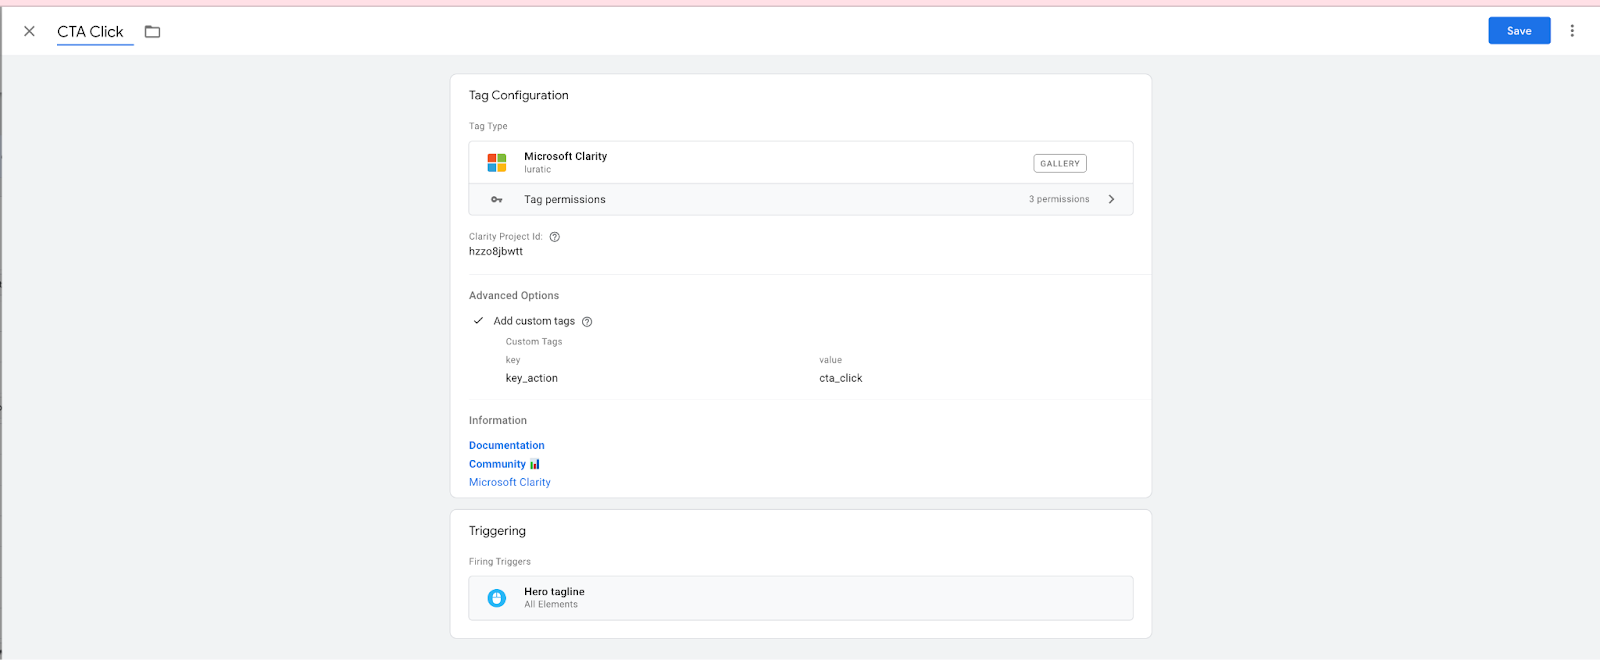
Navigate again into Google Tag Supervisor and discover the Microsoft Readability group template by Luratic. You probably have Microsoft Readability hard-coded, I counsel you migrate it to the template so that you could use their built-in customized tag characteristic, which we’ll be using for this experiment. You can too do that with code as a substitute of the template in case you are a masochist.
Add in a key: cta_button_audience with the worth of our GTM_Exp. Now you’ll be capable of filter all pages by your cookie variation!

You’ll be able to go one step additional by additionally constructing customized occasions in your CTA clicks & conversions, which is able to make discovering particular recordings a lot simpler.
Now we now have our new Customized Tags. Navigate again to Microsoft Readability and discover the customized filters.

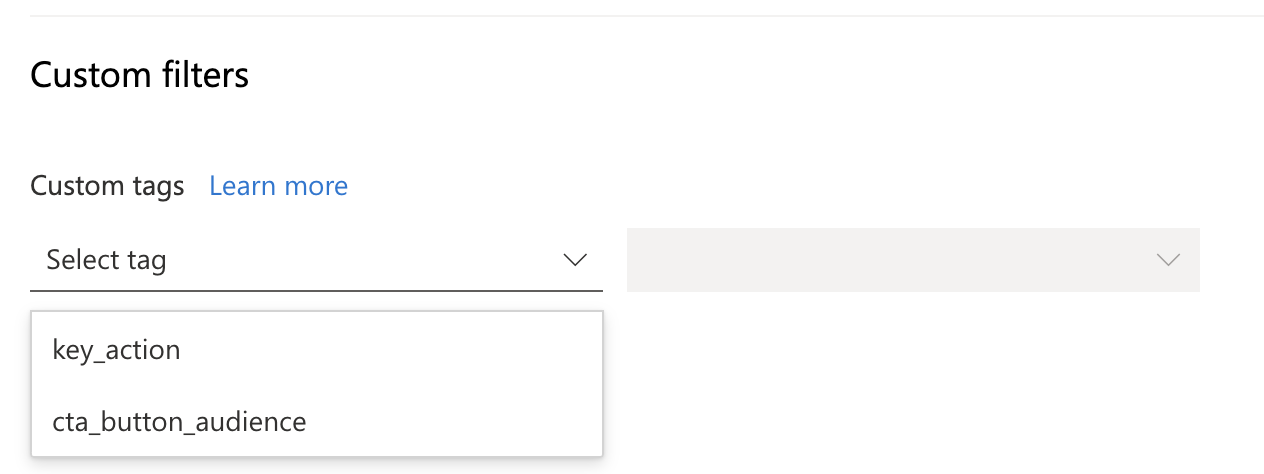

Now we are able to filter by each our key motion that we need to see and in addition the completely different variations. This offers us final readability (pun supposed) into how the completely different pages are performing with our variations! Give it just a few days and also you’ll get your adjustments in two completely different heatmaps!


BONUS: in the event you combine GA4 with Microsoft Readability you may also pull in your GA4 segments (audiences), making this a breeze to investigate! I nonetheless like having the filters however it may well assist streamline the method.
PHEW! We’ve Reached the Finish
You probably did it! You made it! You created a totally functioning A/B take a look at machine in GTM with FREEEEE instruments. However yeah that was quite a lot of work. You might need to pay for one thing to keep away from the lengthy and drawn out (however cool) course of above. However in the event you don’t and you find yourself utilizing this answer…perhaps you may pay me as a substitute 🙂